
Complete Floor Tile Renovation Workflow for Stunning Results
FLOOR TILE RENOVATION
Tackling a tile floor renovation often feels more complex than it should. From hidden moisture issues to uneven surfaces, skipping key preparation steps can lead to headaches down the line. Studies show that addressing subfloor condition early prevents up to 80% of common installation failures. Whether you are giving your floors a fresh look or fixing old problems, following a clear, step-by-step process will help you achieve a durable and professional finish.
Table of Contents
- Step 1: Assess Current Flooring and Gather Materials
- Step 2: Prepare the Subfloor for Renewal
- Step 3: Lay Out Tiles and Apply Adhesive
- Step 4: Install Floor Tiles with Precision
- Step 5: Grout and Seal for Lasting Quality
- Step 6: Inspect and Clean for a Professional Finish
Quick Summary
| Key Point | Explanation |
|---|---|
| 1. Assess flooring for moisture issues | Check for signs of dampness and structural weakness before renovation to prevent future complications. |
| 2. Prepare subfloor meticulously | Clean and level the subfloor with a leveling compound to ensure a smooth tile installation. |
| 3. Layout tiles carefully before installation | Dry lay tiles to create a precise plan and minimize cuts, ensuring a professional appearance. |
| 4. Use proper adhesive application techniques | Spread adhesive evenly with a notched trowel and press tiles firmly to avoid air pockets and misalignment. |
| 5. Grout and seal for durability | Apply grout and sealant properly to protect tiles and enhance longevity, ensuring a cohesive finish. |
Step 1: Assess Current Flooring and Gather Materials
Successfully renovating floor tiles begins with a thorough assessment of your existing flooring and strategic material preparation. This crucial first step determines the trajectory of your entire renovation project and helps prevent potential complications down the line.
Start by conducting a detailed inspection of your current floor surface. According to willinghamparishcouncil.gov.uk, moisture and dampness are critical factors to evaluate before any floor renewal. Look for signs of water damage, uneven surfaces, cracks, or areas of potential structural weakness. Pay special attention to ground floor areas and spaces near doors where moisture tends to accumulate.
For a successful tile installation, gather all necessary materials before beginning work. This includes tiles, adhesive, grout, spacers, a notched trowel, tile cutter, measuring tape, and level. As recommended by cdn.hellesdon-pc.gov.uk, ensure you have levelling compound to create a smooth subfloor surface. Pro tip: Always purchase 10% extra tiles to account for cuts, breakages, and future replacements.
Once you have completed your floor assessment and gathered materials, you are ready to move on to surface preparation and subfloor levelling. Proper groundwork now will guarantee a professional and long-lasting tile installation.
Step 2: Prepare the Subfloor for Renewal
Subfloor preparation is a critical stage in ensuring a professional and long lasting tile installation. This foundational step determines the quality and durability of your new flooring, making it essential to approach with precision and care.
According to cdn.hellesdon-pc.gov.uk, applying a levelling compound is crucial to create a smooth and even surface before tile installation. Start by thoroughly cleaning the existing floor, removing any debris, dust, or loose materials. Use a floor scraper to eliminate old adhesive residue and ensure a clean base. Check the surface for levelness using a long spirit level place across different areas of the floor. Any significant dips or rises over 3mm per 2 metre length will require levelling compound application.
Before proceeding with levelling, willinghamparishcouncil.gov.uk emphasises the importance of addressing underlying moisture issues. Inspect the subfloor for signs of dampness, especially in ground floor areas. If you detect any moisture problems, consult a professional to install a damp proof course or conduct necessary remedial works. For concrete subfloors, use a moisture metre to verify acceptable humidity levels before applying levelling compound.
Once your subfloor is clean, level, and moisture free, you are ready to move forward with tile installation. Proper preparation now will prevent future issues and guarantee a stunning, professional finish.
Step 3: Lay Out Tiles and Apply Adhesive
Laying out tiles and applying adhesive is a precision task that transforms your floor renovation from preparation to actual installation. This critical step requires careful planning, attention to detail, and a methodical approach to ensure a professional finish.
According to gcs.ac.uk, professional floor covering techniques involve strategic tile setting. Begin by dry laying your tiles to create a precise layout plan. Start from the centre of the room and work outwards, using chalk lines to establish perfect perpendicular reference lines. Measure carefully to ensure symmetrical tile placement and minimise cut tiles along walls. This approach helps you visualise the final result and identify any potential layout challenges before applying adhesive.
As highlighted by findapprenticeship.service.gov.uk, achieving a professional finish requires careful adhesive application. Use a notched trowel held at a 45-degree angle to spread adhesive evenly, creating consistent ridges. Work in small sections to prevent the adhesive from drying before tile placement. Press each tile firmly into the adhesive with a slight twisting motion, using tile spacers to maintain uniform grout lines. Clean any excess adhesive immediately to prevent hardening.
With your tiles carefully laid and adhesive applied, you are now ready to move on to the grouting phase. The precision of this step will determine the overall quality and appearance of your new floor.
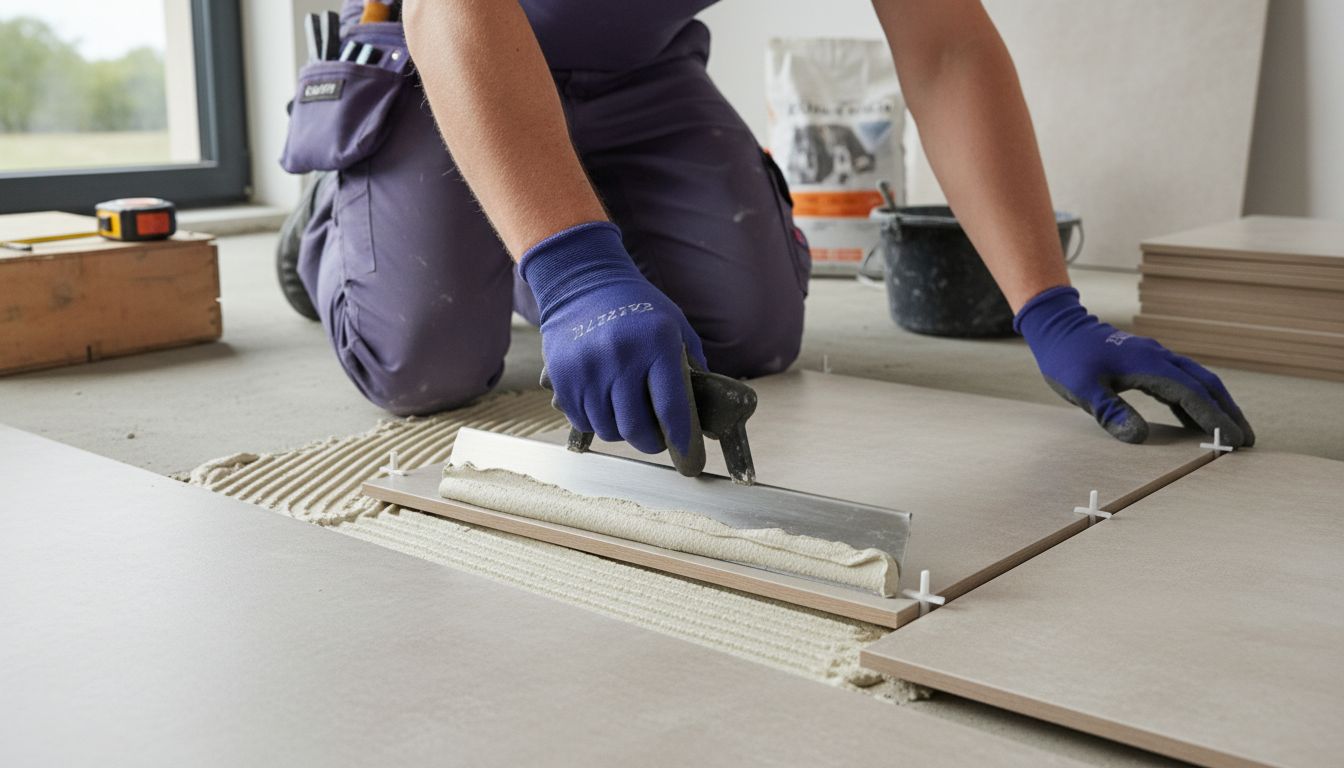
Step 4: Install Floor Tiles with Precision
With your adhesive carefully applied, the moment has arrived to transform your prepared surface into a stunning floor. Installing tiles requires a methodical approach that combines technical skill with artistic precision.
According to gcs.ac.uk, professional floor covering techniques demand meticulous attention to detail during installation. Begin by carefully placing each tile into the adhesive using a gentle twisting motion to ensure maximum contact and eliminate air pockets. Maintain consistent pressure and alignment, using your tile spacers to create uniform gaps for grouting. Work systematically across the room, checking your progress with a spirit level to guarantee a perfectly flat surface.
Professional tile installation, as highlighted by findapprenticeship.service.gov.uk, requires precision in handling cut tiles. For edges and corners, use a quality tile cutter or wet saw to create clean, precise cuts. Measure twice and cut once, ensuring each tile fits seamlessly into your overall design. Pro tip: Always wear safety glasses and work gloves when cutting tiles to protect yourself from sharp edges and potential debris.
With your tiles now expertly placed, you are ready to move forward to the final stage of grouting. Your careful precision during installation will ensure a professional and long lasting floor that looks immaculate.
Step 5: Grout and Seal for Lasting Quality
The final stage of your tile renovation transforms individual tiles into a cohesive and protected floor surface. Grouting and sealing are crucial steps that will determine the longevity and appearance of your newly installed tiles.
According to gcs.ac.uk, professional floor covering techniques emphasise the importance of proper grout application. Begin by selecting a grout colour that complements your tile design. Mix the grout to a smooth consistency following manufacturer instructions. Use a rubber grout float held at a 45-degree angle to spread grout diagonally across tiles, ensuring complete coverage of the tile joints. Work in small sections and remove excess grout with the float edge before it dries.
Professional installers, as highlighted by findapprenticeship.service.gov.uk, understand the critical nature of sealing for long lasting results. After allowing grout to cure for 24 to 48 hours, apply a high quality penetrating sealer using a foam applicator or brush. Ensure even coverage and wipe away any excess sealer to prevent a hazy finish. Pro tip: Test the sealer on a small inconspicuous area first to verify colour and absorption.
With grouting and sealing complete, your floor is now protected and ready to withstand daily wear. Your meticulous approach will ensure a beautiful and durable tile installation that will look stunning for years to come.
Step 6: Inspect and Clean for a Professional Finish
The final stage of your tile renovation transforms a technical installation into a stunning visual masterpiece. Thorough inspection and careful cleaning are the hallmarks of a truly professional floor renovation.
According to gcs.ac.uk, professional floor covering techniques require meticulous final inspection. Begin by examining the entire floor surface under bright, natural light. Check for any uneven tile edges, grout inconsistencies, or adhesive residue. Run your hands across the surface to feel for any irregularities and use a straightedge to verify perfect alignment. Pay close attention to tile corners, edges, and junction points where precision matters most.
Professional installers, as highlighted by findapprenticeship.service.gov.uk, understand the importance of thorough cleaning. Use a pH neutral tile cleaner specifically designed for your tile type. Apply the cleaner with a soft microfibre mop or cloth, working in small sections and avoiding saturating the surface. Rinse thoroughly with clean water to remove any cleaning solution residue. Pro tip: Wait at least 72 hours after grouting before performing a deep clean to allow grout to fully cure.
With your tiles inspected and cleaned, you have now completed a professional grade floor renovation. Your attention to detail will ensure a beautiful floor that looks immaculate and performs exceptionally for years to come.
![]()
Transform Your Floor Renovation with Premium Tiles and Expert Support
Renovating floor tiles can be daunting when faced with challenges like uneven subfloors, moisture issues, or achieving flawless tile alignment. This detailed workflow highlights common hurdles such as preparing your surface with levelling compound, precise tile layout, and meticulous grouting to secure a professional finish. If you want to avoid costly mistakes and bring your vision to life with confidence, having the right materials and expert guidance is essential.

Discover a wide selection of high-quality tiles suited for every stage of your project at Vividotiles.co.uk. With options ranging from elegant marble effect tiles to durable outdoor paving, you can easily find tiles that match your style and technical needs. Benefit from affordable pricing, free UK delivery on many products and a straightforward shopping experience designed for renovators and homeowners alike. Start your renovation with the best foundations by visiting Vividotiles.co.uk now and explore the complete range of premium tiles to make your floor a stunning and lasting success.
Frequently Asked Questions
How do I assess my current flooring before a tile renovation?
Begin by conducting a detailed inspection for moisture, cracks, and structural weaknesses. Check areas near doors for moisture accumulation and ensure the floor surface is even to avoid complications later.
What materials do I need for a complete floor tile renovation?
Gather essential materials such as tiles, adhesive, grout, spacers, a notched trowel, tile cutter, measuring tape, and levelling compound. Always purchase an extra 10% of tiles to account for cuts and potential breakages.
How can I ensure my subfloor is properly prepared for tile installation?
Clean the existing subfloor thoroughly, removing any debris or old adhesive. Use a levelling compound if needed and confirm the surface is moisture-free for optimal tile adhesion.
What steps should I take to lay out tiles accurately?
Start by dry laying your tiles from the room’s center outward, using chalk lines for reference. This organized approach helps visualize the final result and identify layout challenges before applying adhesive.
How do I apply grout for the best results?
Select a grout color that complements your tiles, mix it to a smooth consistency, and use a rubber float for application. Work in small sections to apply grout evenly across the joints and promptly remove excess to maintain a clean finish.
What cleaning steps should I follow after completing the tile installation?
Inspect the tiles for any irregularities and clean with a pH neutral tile cleaner using a soft mop or cloth. Wait at least 72 hours after grouting before deep cleaning to ensure the grout has fully cured.
Recommended
- Floor Tile Replacement Guide: Achieve Perfect Results Easily - Vivido – Vivido Tiles
- Floor Tiling Workflow: Achieve Flawless Tile Installation – Vivido Tiles
- Tile Over Tile: Complete Guide for UK Installers - Vivido Tiles
- Wall Tiling Tutorial: Achieve Flawless Results Step-by-Step - Vivido – Vivido Tiles