
Preparing Floors for Tiling: Achieve Flawless Results
Preparing Floors for Tiling: Achieve Flawless Results
Preparing floors for Tiling: Dust and uneven floors can ruin even the best tiling job. For british homeowners, skipping proper floor preparation is a common mistake that leads to problems later. In fact, poor surface prep often causes loose tiles and costly repairs. Starting your tiling project with the right foundation saves time and ensures a flawless finish that lasts. This guide reveals the proven steps professionals rely on, so your new tiles look perfect and stay secure from the very start.
Table of Contents
- Step 1: Clear And Clean The Floor Area Thoroughly
- Step 2: Repair And Patch Any Surface Imperfections
- Step 3: Level The Floor For Uniform Support
- Step 4: Prime The Surface To Enhance Adhesion
- Step 5: Check Floor Readiness Before Tiling
Quick Summary
| Key Takeaway | Explanation |
|---|---|
| 1. Thoroughly clean the floor | Remove all debris and dust to ensure a pristine surface for tile adhesion and installation. |
| 2. Repair surface imperfections | Identify and fix cracks or holes using appropriate repair materials for a smooth tiling base. |
| 3. Level the floor accurately | Use a levelling compound to create an even surface, vital for a seamless tile layout and appearance. |
| 4. Prime the surface effectively | Apply the correct primer to enhance adhesive strength, ensuring tiles bond well to the substrate. |
| 5. Assess floor readiness thoroughly | Check moisture levels and structural integrity to confirm the floor is prepared for successful tiling. |
Step 1: Clear and clean the floor area thoroughly
Preparing your floor for tiling starts with a meticulous cleaning process that sets the foundation for a flawless installation. Before you begin laying any tiles, you need to transform your floor into a pristine surface that will support your new tiling project.
According to Historic England, the key to successful floor preparation is using the right cleaning technique. Begin by removing all furniture and debris from the area. Sweep thoroughly to eliminate dust and loose particles. Next, mix a mild detergent with hot water and use a natural bristle brush to clean the surface systematically. Work in sections to ensure no area is missed.
One critical warning: avoid saturating the floor with water. Excessive moisture can damage underlying surfaces or create uneven conditions that compromise tile adhesion. Rinse the area with clean water and allow it to dry completely. Use fans or open windows to accelerate the drying process. A completely dry and clean surface ensures your tile adhesive will bond perfectly, preventing future issues like loose tiles or uneven installation. Complete Floor Tile Renovation Workflow for Stunning Results provides additional insights into creating the ideal preparation environment for your tiling project.
Step 2: Repair and patch any surface imperfections
Before laying tiles, your floor surface must be transformed from a rough canvas into a perfectly smooth foundation. This critical step ensures that your final tiling result looks professional and remains durable for years to come.
According to the NOCN Skills for Tiling guide, preparing surfaces for tiling requires careful inspection and repair. Start by identifying all surface imperfections such as cracks, holes, or uneven areas. For small cracks and minor surface damage, use a high-quality floor levelling compound. Apply the compound with a trowel, working methodically to create a smooth and even surface. Larger holes might require patching with a suitable repair mortar or filler specifically designed for your floor type.
As outlined in Contracts Finder, removing incompatible materials is crucial. Before applying any repair compounds, ensure the surface is completely clean and free from oil, grease, or other substances that could prevent proper adhesion. Once repairs are complete, allow the surface to dry thoroughly and sand down any excess filler to create a perfectly smooth base ready for tiling. With a carefully repaired surface, you are now one step closer to achieving a flawless tile installation.
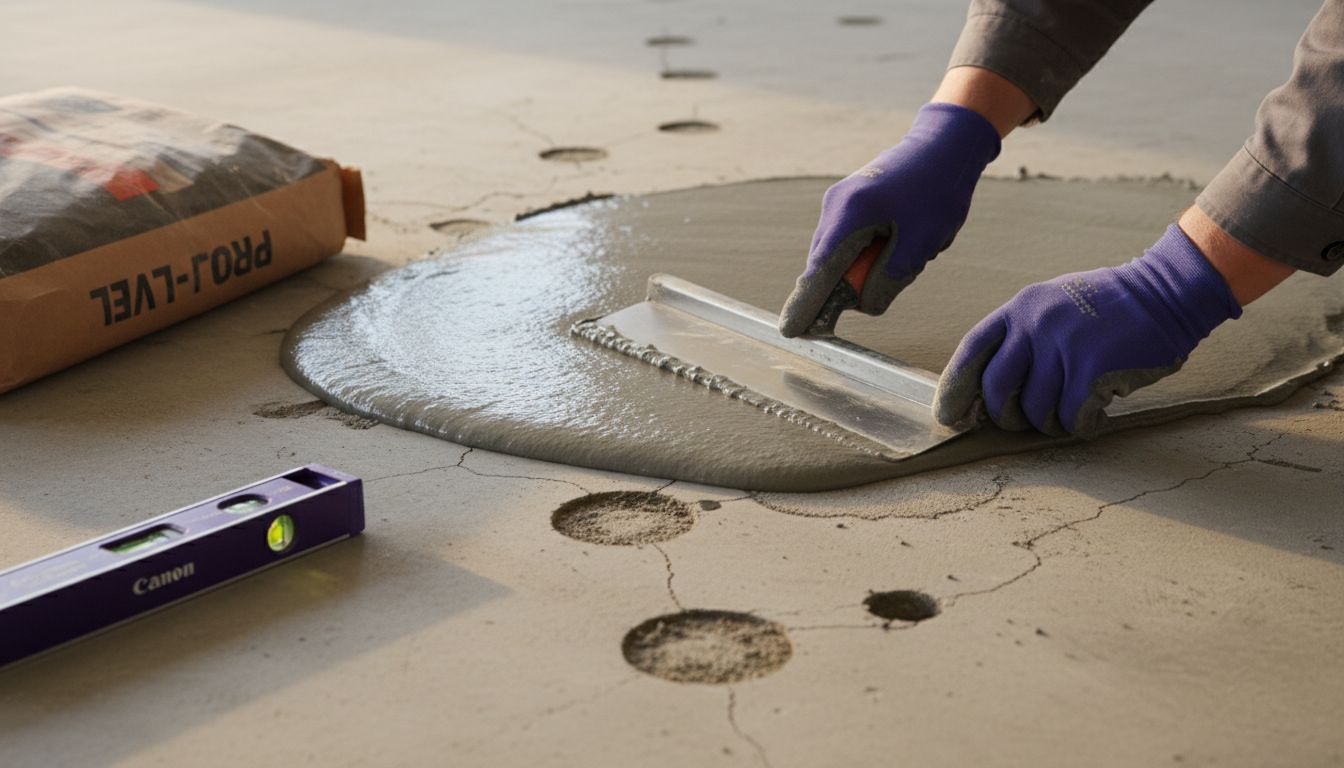
Step 3: Level the floor for uniform support
Creating a perfectly level floor is the foundation of a professional tiling installation. This crucial step ensures your tiles will sit evenly and look seamless across the entire surface.
According to Contracts Finder, UK construction guidelines emphasize the critical importance of achieving precise background and base tolerances. Begin by using a long spirit level to identify any uneven areas or high and low points across your floor. For minor variations, a self levelling compound works brilliantly. Pour the compound systematically across the floor, using a long handled spreader to create an absolutely flat surface. Work in small sections and ensure the compound spreads evenly without pooling.
The NOCN Skills for Tiling guide recommends paying close attention to accuracy during this process. Allow the levelling compound to dry completely according to manufacturer instructions before proceeding. Pro tip: use a laser level for larger areas to guarantee absolute precision. Your perfectly level floor is now ready for the next stage of tile preparation a critical milestone in achieving a professional installation.
Step 4: Prime the surface to enhance adhesion
Priming your floor is the secret weapon in creating a rock solid foundation for your tile installation. This critical step transforms a good tiling project into an exceptional one by ensuring maximum bond strength between your surface and tiles.
According to Contracts Finder, UK construction guidelines stress the importance of preparing nonporous surfaces before tiling. Select a primer specifically designed for your floor type whether it is concrete, plywood, or existing tile surface. Apply the primer using a roller or brush in smooth even strokes ensuring complete coverage without puddles or missed spots. Work systematically from one side of the room to the other allowing sufficient time for the primer to become slightly tacky but not completely dry.
The NOCN Skills for Tiling guide emphasizes precision during this stage. Wait the recommended time specified by the primer manufacturer typically between 30 minutes to 2 hours before proceeding. Warning: rushing this step can compromise your entire tiling project. A well primed surface creates the perfect canvas for tile adhesion ensuring your new floor will look stunning and stay firmly in place for years to come.
Step 5: Check floor readiness before tiling
Before diving into your tiling project, a thorough floor readiness assessment is your roadmap to a successful installation. This critical evaluation will save you time, money, and potential frustration down the line.
According to Contracts Finder, UK construction guidelines emphasize the importance of verifying substrate conditions. Start by checking moisture levels using a professional moisture meter. For concrete surfaces, ensure they have dried completely with moisture content below 75%. Inspect the floor for structural integrity checking for any signs of movement, cracks, or uneven areas that might compromise your tile installation.
The NOCN Skills for Tiling guide recommends a comprehensive readiness checklist. Verify that your substrate is clean, dry, and structurally sound. Test the floor’s flatness using a long spirit level checking for any variations greater than 3mm over a 2 metre span. For those looking to dive deeper into professional tiling techniques, our Floor Tiling Workflow guide offers additional insights into achieving a flawless installation. Pro tip: when in doubt, consult a professional to ensure your floor is absolutely ready for tiling.
Prepare Your Floor and Choose the Perfect Tiles with Confidence
Achieving flawless tiling results requires meticulous floor preparation just like detailed in the “Preparing Floors for Tiling: Achieve Flawless Results” guide. From thorough cleaning and repairing imperfections to leveling and priming the surface, every step directly impacts how well your tiles will adhere and look over time. If you face challenges ensuring a perfectly level and primed floor ready for tiling, selecting high-quality tiles that complement your efforts is equally important.

Discover a vast selection of premium tiles at Vivido Tiles designed with durability and style in mind. Whether you need porcelain, natural stone, patterned or outdoor tiles each category supports your ambition for a smooth, professional finish. Visit our Main Site today and benefit from expert guidance, budget-friendly prices and free UK delivery on many items. Take the next step to transform your renovation project by pairing your carefully prepared floor with tiles that guarantee lasting beauty and quality.
Frequently Asked Questions
How should I clean my floor before tiling?
Start by removing all furniture and debris, then thoroughly sweep the area to eliminate dust and loose particles. Mix a mild detergent with hot water and use a natural bristle brush to clean the surface systematically, ensuring you do not saturate the floor with water.
What should I do if my floor has cracks or holes?
Identify any surface imperfections like cracks or holes, and use a high-quality floor levelling compound for small cracks or a suitable repair mortar for larger ones. Apply the compound with a trowel, ensuring a smooth and even surface before allowing it to dry completely.
How can I level my floor for tiling?
To create a level floor, use a long spirit level to identify high and low points. For minor discrepancies, pour a self-levelling compound and spread it evenly using a long-handled spreader, ensuring it dries according to manufacturer instructions.
Why is priming my floor important before tiling?
Priming the floor enhances adhesion between the surface and the tiles, ensuring a strong bond. To do this, select a primer suitable for your floor type and apply it with a roller or brush, allowing it to become slightly tacky before proceeding with tiling.
What should I check to ensure my floor is ready for tiling?
Verify that your floor is clean, dry, and structurally sound by checking moisture levels with a moisture meter and assessing for any structural integrity issues. Use a long spirit level to test for flatness, ensuring no variations greater than 3mm over a 2 metre span.
How do I ensure a successful floor preparation for tiling?
To ensure a successful floor preparation, clean thoroughly, repair any imperfections, level the surface, prime adequately, and perform a final readiness check. Conduct these steps in order, allowing adequate drying times, to achieve a flawless tile installation.
![]()
Recommended
- Floor Tiling Workflow: Achieve Flawless Tile Installation – Vivido Tiles
- Complete Floor Tile Renovation Workflow for Stunning Results – Vivido Tiles
- Wall Tiling Steps for a Perfect Finish: Complete Guide - Vivido Tiles
- Floor Tile Replacement Guide: Achieve Perfect Results Easily - Vivido – Vivido Tiles